

Developed and Distributed by Canzona Technologies


Photo Sieve Manual - Getting Started
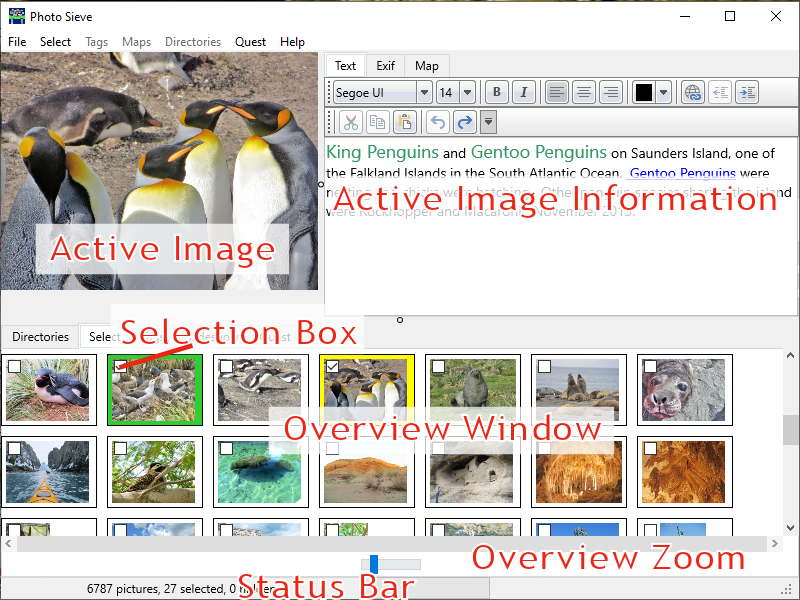
Photo Sieve® does not delete photos from your computer.
You may tell Photo Sieve® to ignore certain photos but they
are still on your computer and may be reloaded later.
Photo Sieve® can rename photos or move photos to another folder.
Screen Regions
A horizontal adjustable splitter separates the top "Active Image" region from the bottom "Overview" region. Left-click and drag the spitter to adjust the window heights.
A vertical adjustable splitter separates the left "Active Image" window from the right "Active Image Information" window. Left-click and drag the spitter to adjust the window widths.
A status bar at the bottom of the screen shows information about the files loaded.
Quick Start
Click menu "Help/Demo" unless you already purchased the upgrade. The demo activates most options except saving.
Click menu "File/Load Directory" and choose a directory with pictures. The "Directories" menu has more options. Click the "Selection Box" on a few photos or right-click and choose "Select All" from the popup menu. If you have thousands of photos to work on, load them in batches of 50 - 300 at a time to keep things manageable.
Click the "Select" tab in the bottom "Overview" window to see all the pictures you just loaded. Click a "Selection Box" to select or deselect a photo.
In the upper left "Active Image" window, use the mouse wheel to zoom or left-click and drag to reposition pictures that are larger than the window. Right-click for a popup menu with more options.
The "SlideShow" tab in the "Overview" windows has buttons to move through your pictures, scale the the picture to fit the "Active Image" window, or display the picture at it's full size.
The "Map" tab in the upper right "Active Image Information" window shows the location if your picture includes GPS information. Use the mouse wheel or left-click and drag to reposition the map. Select the type of map from the "Map" menu and optionally load a gpx, kml, or kmz track with pictures.
The "Exif" tab in the upper right "Active Image Information" window shows any Exchangeable image file (Exif) information.
The "Text" tab in the upper right "Active Image Information" window is where you enter titles, notes, links, and more.
Click the "Tags" tab in the lower "Overview" window to see picture tags in a grid similar to a spreadsheet. The "Tags" menu is only active when you're viewing the "Tags" tab.
Click the "Quest" tab in the lower "Overview" window to create or edit EcoRamble Adventure Quests for Android and iOS devices.