

Developed and Distributed by Canzona Technologies


Photo Sieve Manual - Loading Directories
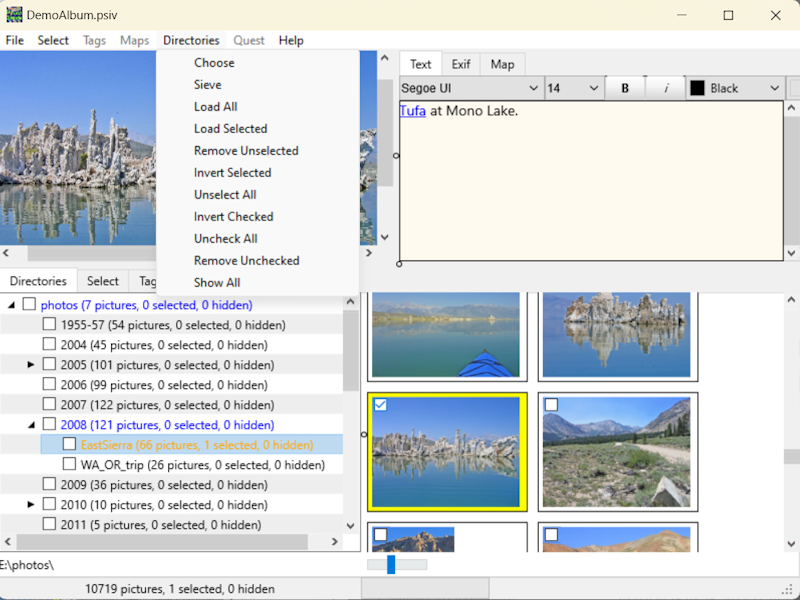
The left side of the "Load Directories" tab shows the base directory and all subdirectories. Click menu "Directories/Choose" to set the base directory. Photo Sieve automatically opens the base directory and all subdirectories that contain pictures. The status bar at the bottom show a summary of all directories. An adjustable splitter separates the directory tree from the thumbnail views on the right side. Click and drag the splitter or resize the window to suit your needs. Right-click on the directory to see a popup menu for expanding and collapsing branches of the directory tree.
Click on a branch of the directory tree to show thumbnails of the pictures in that directory. Clicking the checkbox on a branch of the tree checks or unchecks that branch. Shift-click checks all branches between the last branch selected and the current branch, as well as all sub-branches. Use the zoom slider to adjust the size of the thumbnail previews. It might take several seconds to load many thumbnails.
Click the selection box in the upper left of each thumbnail image to select or deselect that thumbnail. Shift-click selects all pictures between the previous click and the clicked thumbnail. Ctrl-shift-click keeps all previous selections and adds everthing between the previosly clicked thumbnail and the clicked thumbnail.
Right-clicking on a thumbnail shows a popup menu with more select options and options to hide thumbnails. "Remove Unselected" only removes the selected thumbnails from the viewer. Hiding thumbnails keeps them loaded but hides them. The "Show All" button shows all hidden thumbnails. As you select and hide thumbnails, the statistics update in the directory window and status bar. The directory text turns green if you select all thumbnails in that directory and all subdirectories. Orange text indicates that some thumbnails are selected. Blue text indicates nothing selected in that branch, but there are some selections in sub-branches. Branches with light gray text have no pictures or selected pictures in sub-branches.
Use the "Sieve" menu to sieve thumbnails in all subdirectories, keeping only those that match your sieve request. You can do successive sieve requests to further reduce the number of thumbnails.
Once you've gone through all the subdirectories, you can use the "Load All" or "Load Selected" buttons to load the photos into Photo Sieve's "Select" and "Tags" tabs for viewing or processing. As you load more pictures, everything gets slower and it is more difficult to work with hundreds of pictures at once. Divide and conquer by breaking very large albums into smaller groups when possible.
When working with a large collection of pictures, divide and conquer. Menu "Directories/Remove Unselected" removes all unselected pictures from all branches of the directory tree. Menu "Directories/Remove Unchecked" removes the unselected pictures from all unchecked branches of the directory tree. If you have thousands of pictures in many directories, and you want to find all the pictures of Uncle Gargoyle, repeat the "Sieve" process several times based on dates of family reunions, location of Uncle Gargoyle's home town, or filenames. After menu "Directories/Add Selected" you can use menu "Directories/Toggle Selected" and "Directories/Remove Unselected" to remove the pictures you just added. Menu "Directories/Toggle Selected" again unselects everything.
Optionally add text or a custom tag in the "Tags" tab with menu "Tags/Add Custom Tag". After tagging all the pictures, you can later sieve for tags for matching your custom text. Optionally save all the pictures of Uncle Gargoyle as an album with menu "File/Save Album". If you have more pictures of Uncle Gargoyle than you can load and manage at once, divide them into several smaller albums, such as "Uncle Gargoyle accepting his Nobel Prize" or "Uncle Gargoyle clog dancing". The pictures of Uncle Gargoyle dancing to celebrate his Nobel Prize can be in both albums.
As a general guideline, decide on some appropriate tags such as "Subject", "Location", "Category", or "Index" that will apply to all your pictures. Use appropriate sieving operations to select common themes that will share one or more tags. Once you have your pictures tagged, you can sieve for tag values. How specific you get with the tags depends in part on how many pictures are in a group. If you have fewer than 100 pictures in a general group such as a country, you can use a very general tag name and load all 100 at once.
If there are thousands of pictures in a general group, you might want to get more specific and divide into sub-groups with a
manageable number of pictures in each sub-group. You could also create other tags within each general category. These sub-category tags may be unique
to one general category, but it's OK if some words appear in more than one sub-category tag.
Just sort on the most general tag column and remove any pictures that don't belong.
As an example, you might have a general tag with a country name, and sub-category
tags such as "Animals" and "Statues". Sieving for "Statues" might select pictures from many countries.
In the "Tags" tab, sort on the "Country" column. You might then do a secondary sort by shift-clicking on the "Statues" column.
Each tag may contain multiple words. You could for instance, have an "Index" tag containing the words "Italian", "Sculpture", and "Renaissance".
Sieving operations select pictures that match. Any previosly selected pictures are still selected. If you want to do a sieve within a sieve, start with a sieve for the most general attributes. Now use menu "Directories/Remove Unselected" followed by "Directories/Toggle Selected". Now all your pictures selected by the previous sieve operation are the only pictures remaining and all are unselected. Repeat the process as you get more specific.
You might want to add text at a later time as you create albums and slideshows.